On the desktop, the "Displays Setting" display configuration menu is available to all users.
- The rooms are equipped with PC All-In-One
- A projector, a TV display and a graphics tablet are connected to the PC.
- T211 and T212 are not equipped with a graphics tablet.
- A projector, a TV display and a graphics tablet are connected to the PC.
- Before making display selections, you must check that the required devices are turned on.
- The TV display is in sleep mode by default and starts automatically (except for T211 and T212).
- If required, it is switched on with the remote control, which is in the right-hand desk drawer. The drawer is opened by holding the employee ID card against the sensor on the table top.
- The graphic tablet is connected via a USB cable. It needs to be switched on (wake up) by pressing the ON button on the top right edge.
- The projector is switched off by default.
- It is switched on with the remote control, which is in the right-hand desk drawer. The drawer is opened by attaching the employee ID card to the sensor on the desk top.
- The TV display is in sleep mode by default and starts automatically (except for T211 and T212).
- The user selects the desired option (0 to 8) with the mouse cursor
- A description of the selected setting is displayed in the tooltip.
- Confirm the selection with the OK button
- If the OK button is not available, the selected option is not available for the room.
- After the selection has been made, it is necessary to wait, sometimes the setting can take up to 20 seconds.
- If you do not find the scenario you need for your teaching in the menu, contact the IT department. It is NOT recommended to use the MS Windows "Screen Settings" user interface to set up displays.
Application icon and window
Image
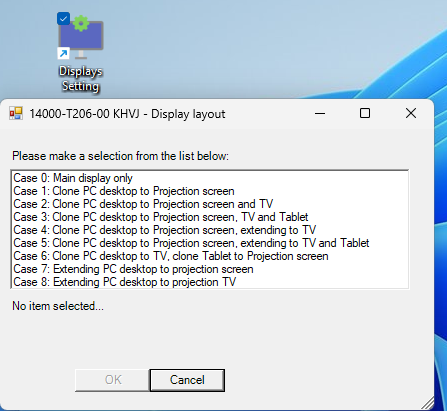
Overview of individual scenarios:
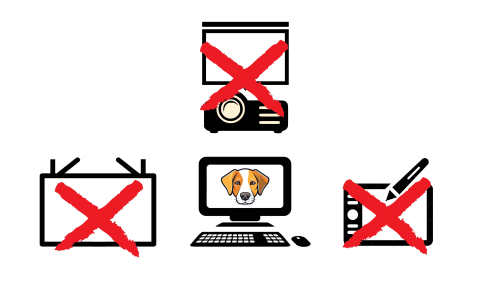
- Case 0:
- No projection
- All display devices, except the All-in-One's integrated display, are turned off.
Image
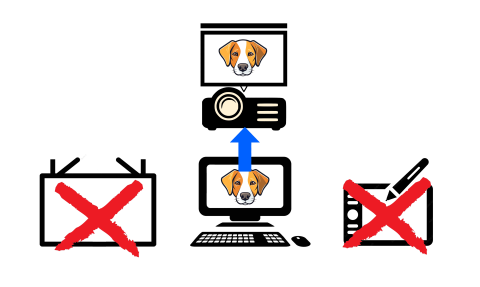
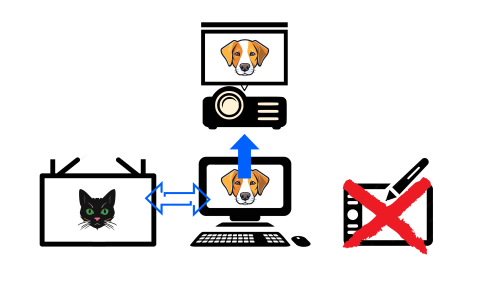
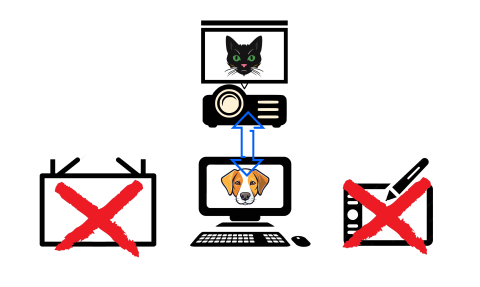
- Case 1:
- Standard projection
- The image from the PC is cloned onto the projection screen.
Image
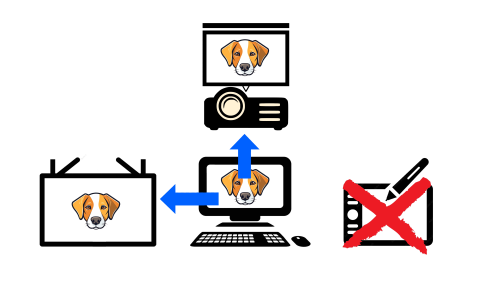
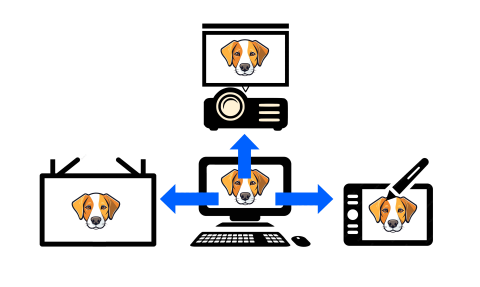
- Case 2:
- Extended projection
- The image from the PC is cloned onto the projection screen and the TV display.
Image
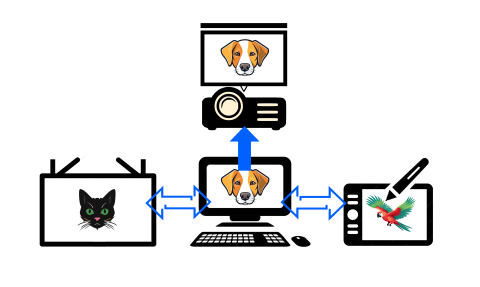
- Case 3:
- Enhanced projection + tablet display
- The same image everywhere. The image from the PC is cloned onto the projection screen, the TV display and the graphics tablet.
Image
- Case 4:
- Settings for video conferencing
- It is projected on a screen and e.g. previews of remote participants can be placed on the TV.
- The computer image is cloned onto the projection screen, the TV display is an extension of the desktop.
- Settings for video conferencing
Image
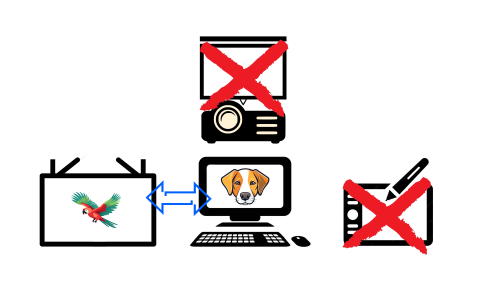
- Case 5:
- Standard projection using additional displays
- The PC image is projected onto the screen, additional materials can be placed on the TV and the tablet is private to the teacher.
- The PC is cloned onto the projection screen, the TV (left) and tablet (right) are extensions of the PC desktop.
- Standard projection using additional displays
Image
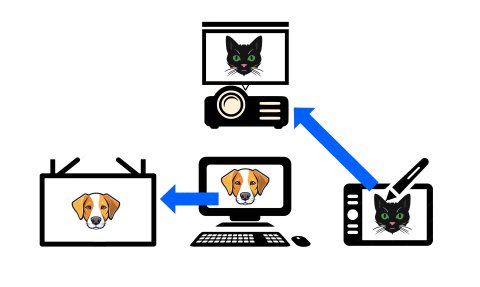
- Case 6:
- Teaching with a graphics tablet
- The image from the graphics tablet (e.g. from the Whiteboard app) is displayed on the screen
- The presentation from the PC is projected on the TV
- The PC image is cloned onto the TV, independently the tablet is cloned onto the projection screen.
- Note: If the cursor moves to another screen (e.g. the PC screen) when the graphics tablet pen is moving, you need to switch the active screen for the tablet with the tablet express button (first from the bottom in the vertical row).
- Teaching with a graphics tablet
Image
- Case 7:
- Screening of selected materials.
- The PC desktop is private for the teacher, he/she places only what he/she wants to present on the screen.
- The canvas is an extension of the PC desktop, other devices are turned off.
- Not valid for classrooms T204, T205 and T206 where the tablet image is linked to the projection screen. The tablet must therefore be switched off with the ON/OFF button.
- Screening of selected materials.
Image
- Case 8:
- Use of a "black" board with the possibility of additional projection
- The projector is switched off, it does not prevent the use of the classic whiteboard.
- Selected materials (e.g. assignments) can be placed on the TV screen.
- The PC display is private to the teacher.
- The TV display is an extension of the PC desktop, other devices are switched off.
- Use of a "black" board with the possibility of additional projection
Image
Troubleshooting
- If a device does not receive a signal after selecting a scenario:
- Check that the device is not powered off, in sleep mode, or without power.
- Check for obvious cable disconnection (especially the graphics tablet)
- If the projector is lit and has not received a signal, check that it is switched to HDMI1 input (white remote)
- If the TV display does not show the desired signal, check that it is switched to the HDMI1 input (black remote control)
- Restart or turn off and on the PC and try the settings again
- Contact FJFI IT staff