Classrooms T207-T210
Classrooms T207-T210Access
- rooms do not have an electronic lock
- the electronic lock is on the department and locks the right drawer in the department
- the drawer contains:
- projector remote control (white)
- 55" LCD monitor remote control (black)
- video conferencing system remote control (grey)
- pen for XPpen graphics tablet
laser presenter(to be added)- HDMI cable, Ethernet cable and possibly other accessories
- the drawer contains:
Projection equipment
- PANASONIC projector [type PT-VMZ51SEJ] with 1920x1200 resolution
- screen with electric shift
- 55" LG 55UL3J-EP LCD monitor with 4k resolution
- description of options below
Videoconferencing equipment
- Logitech Rally videoconferencing system: video camera and speaker on the back/side wall, omnidirectional microphone on the department, permanently connected to the PC in the department, remote control, ready for use with MS Teams (Manual)
- A set of Rode lapel microphones is available on request (description)
Computer equipment
- 1x all-in-one HP PC at the department, connected to Logitech videoconferencing system, control PC for MS Teams (Instructions)
- 1x USB-A and 1x USB-C port for data devices on the right side of the PC
- PC with Windows 10 has an English user environment with US keyboard as default, user has the option to set a different language environment in Windows
- the user logs into the PC with a CTU account
Connection points
- HDMI connection to the projector on the right (HDMI 2 input)
- 2x socket 230V
- under the window at the department, LAN RJ45 port for laptop connection
- in the left drawer of the department there is a multiple 230V socket with USB-A ports for charging phones and accessories
Other parameters
- fluorescent lighting
- shading by vertical fabric blinds with manual control
- 2x wide manually sliding green (T207, T209, T210) or black (T208) boards
- without air conditioning
- without acoustic treatment
T207-T210 - AV equipment options
T207-T210 - AV equipment options- Projection via projector from PC at the department
- The department's AllinOne PC is permanently connected to the projector, display and graphic tablet.
- Please do not disconnect any cables - there are 2 USB ports on the right side of the PC for connecting your flash drives
- When the displays of all stations are turned on, the display setup typically looks like this:
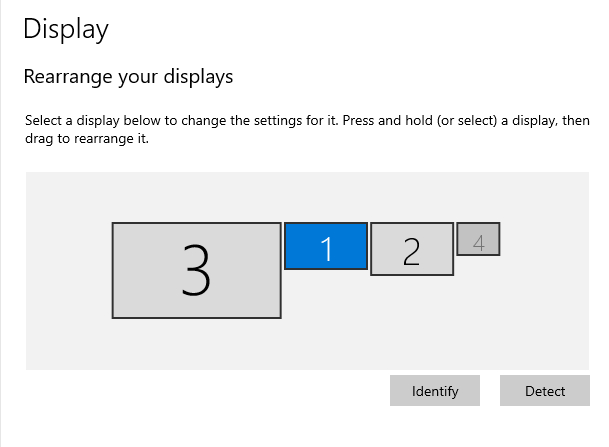
Display numbering:
- ... internal PC display
- ... projector
- ... 55" display
- ... graphic tablet display
note: This display numbering is the default and may not always apply. Only the internal PC display has a fixed number. Other displays can change their numbers, the Windows OS controls the numbering dynamically by itself.
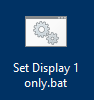
- If not all displays are needed, there is an icon on the desktop that sets the displays to the minimum default setting, where only the internal PC display (= #1) is on and all other displays are turned off. This should also be the default situation for switching on and setting other displays according to individual needs.
There is also an icon on the desktop that turns on all the displays and projects the same image on all of them as on the main PC.

- Projection via projector from a brought device (typically a laptop)
- There is a connection point on the right rear of the department where there is an HDMI port on the far right leading to the projector.
- If you don't have your own HDMI connection cable, it should be available in the right drawer (unlocked by CTU card/chip). The cable is only in the basic design with the same HDMI terminals on both ends. If you need to connect devices with USB-C, DisplayPort and mini or micro HDMI or DisplayPort output variants, it is assumed that you will have a suitable reducer of your own.
- On the projector, you will need to switch the remote control input to HDMI 2 (by default, the projector turns on with HDMI 1 active, which is the input for the department's PC).
- The projector should be able to handle higher resolutions than itself, up to 4k.
- Audio support
- Audio playback is mainly provided by the Logi Rally video conferencing system. The audio part consists of a speaker on the wall and a table microphone. Logi Rally is permanently connected to the AllinOne PC in the department and set up for this mode. The PC has several audio inputs and outputs, so the correct input/output needs to be checked/set in the Windows settings. The audio outputs have the following names:
- Logi Rally Speaker (Logi Rally Audio) = Speaker on the wall by the camera
- Speakers (Realtek(R) Audio) = AllinOne PC internal speakers
- LG SIGNAGE (4- HD Audio Driver for Display Audio) = Speakers in the 55" display
- <some name> = Speaker in the projector
- If the Logi Rally speaker cannot be used at the moment, the audio output can be routed to the LG SIGNAGE. The speakers in the AllinOne PC are not suitable due to their low power.
- Sound from brought-in devices is not supported by default. In case of need, please contact FJFI IT Administration via HelpDesk
- Audio playback is mainly provided by the Logi Rally video conferencing system. The audio part consists of a speaker on the wall and a table microphone. Logi Rally is permanently connected to the AllinOne PC in the department and set up for this mode. The PC has several audio inputs and outputs, so the correct input/output needs to be checked/set in the Windows settings. The audio outputs have the following names:
- Using the 55" display
- The 55" display is primarily designed for video conferencing to display remote participants.
- The display switches on automatically when it detects a signal on its input. It also switches off automatically. Of course, a black remote control can also be used for switching on and off.
- Graphic tablet
- It is permanently located on the right side of the department. To set it up, there is an XPpen application that has an icon on the desktop and also a small icon on the right side of the main panel that looks like this:

- By default, the pen area includes the desktop of all monitors that are currently on in Windows. This causes the pen to react differently than the user would normally expect. In XPpen, you need to set the pen workspace to the display you want.
- It is permanently located on the right side of the department. To set it up, there is an XPpen application that has an icon on the desktop and also a small icon on the right side of the main panel that looks like this: